Category Archives: Small Business Technology

How To Activate Windows 10 / Server 2016 Through Command Line

If you are having problems activating Windows 10, Server 2016, Windows 8, or Server 2012 one of these three solutions below should get you through:

Command Line to Launch Activation GUI:

This is handy if the GUI won’t start and you want to skip some steps to get it to work.

  1. click START (gets you to the tiles)4-no-change-product-key-link-missing-dns-error-0x8007232b-dns-error-activate
  2. type RUN
  3. type slui 3 and press ENTER
    1. yes, SLUI: which stands for SOFTWARE LICENSING USER INTERFACE
      1. SLUI 1 brings up the activation status window
      2. SLUI 2 brings up the activation window
      3. SLUI 3 brings up the CHANGE PRODUCT KEY window
      4. SLUI 4 brings up the CALL MICROSOFT & MANUALLY ACTIVATE window
  4. Type in your product key
  5. Have a nice day.

Command Line to Activate Windows Through Command Line:

  1. Launch a CMD as an Administratorcommand-line-to-activate-windows-slmgr-slui
  2. Type: slmgr.vbs /ipk xxxxx-xxxxx-xxxxx-xxxxx-xxxxx
  3. Press Enter

If your key is valid and you are connected to the internet, it should activate within a second or two.

Edge Router X Remote Access

Add a rule to ruleset WAN_LOCAL to accept tcp port 22,80,443.


Go to the ‘Security’ tab…

Click the button on the right under WAN_LOCAL and select ‘edit ruleset’.  (Pic 1)

This will bring up the ‘Ruleset Configuration fro WAN_LOCAL’ dialog box.  (Pic 2)

Click on the button for ‘Add New Rule’.  (Pic3)

Under ‘Basic’, give the rule a name, choose the ‘Accept’ bullet, Protocol ‘tcp’ bullet, & check the box for logging.  (pic 4)

On the destination tab, enter port 22,80,443 (no spaces)  (Pic5)

Click the ‘Save’ button.

Done.

step1.png
step2.png
step3.png
step4.png
step5.png

Re: Quickly Enable Remote Access to EdgeMAX GUI?

Edge Router X VPN Setup

I just spent the better part of 3 hours tracking down the CLI commands necessary to clear out any old VPN settings and set just the L2TP VPN server on an Ubiquiti Edgemax device running firmware 1.7.1. I gathered all that in one place here for reference.

1.

Connect via SSH

Open either the webportal and click the CLI option (does not allow you to paste) or better yet just download Putty and connect over SSH that way.

2.

Show Running VPN Configuations

configure
#show l2tp config
show vpn l2tp
#show pptp config
show vpn pptp

3.

Delete VPN Configurations

configure
delete vpn pptp
delete vpn l2tp
delete vpn ipsec
commit
save

4.

L2TP Server Configuration

# change eth1 to whatever is the external interface port of the Edgemax
set vpn ipsec ipsec-interfaces interface eth1
set vpn ipsec nat-networks allowed-network 0.0.0.0/0
set vpn ipsec nat-traversal enable
set vpn l2tp remote-access authentication mode local

#Add local users for L2TP
set vpn l2tp remote-access authentication local-users username WhateverUserName password WhatEverUserPassword

# Set a range of IP addresses that are not being used by your LAN DHCP
set vpn l2tp remote-access client-ip-pool start 192.168.x.x
set vpn l2tp remote-access client-ip-pool stop 192.168.x.x

# Set the DNS servers to give out over DHCP for VPN Name Resolution
set vpn l2tp remote-access dns-servers server-1 192.168.x.x
set vpn l2tp remote-access dns-servers server-2 192.168.x.x

# Set the authentication mode for L2TP
set vpn l2tp remote-access ipsec-settings authentication mode pre-shared-secret
set vpn l2tp remote-access ipsec-settings authentication pre-shared-secret ThisIsYourLongPassword
set vpn l2tp remote-access ipsec-settings ike-lifetime 3600

# Set the l2tp listening address to the WAN IP and WAN Gateway
set vpn l2tp remote-access outside-address ThisIsYourWANIP
set vpn l2tp remote-access outside-nexthop ThisIsYourWAN-GW-IP

# Optional to set the MTU but I do this just in case they end up on DSL or T1
set vpn l2tp remote-access mtu 1492

commit
save
exit

5.

Add The Firewall Rules For L2TP Traffic

Open the web browser of choice and enter the LAN IP of the edgemax to login to the portal.
Go to the Security Tab and then find WAN_Local in the Firewall Rules.
Click Actions on the right and drop down choosing Edit Ruleset
Add a new rule with the following settings:
Basic Tab:
Description = L2TP
Enable = Checked (true)
Action = Accept
Protocol = UDP
Choose the Destination Tab
Ports = 500,1701,4500 (no spaces)
Save
Add another rule in the ruleset
Description = ESP
Enable = Checked (true)
Action = Accept
Protocol = choose by name then choose ESP
Save
Save again to exit the firewall settings

6.

Configure Windows L2TP VPN

On your windows box that needs to VPN into the Ubiquiti you will create a new VPN connect using the wizard and then go to ncpa.cpl and set the properties on the VPN connect. Specifically three settings:
1 – On the security tab of the VPN connection properties change the type of VPN to Layer 2 Tunneling Protocol
Choose Advanced Settings right below that option and set the shared secret you used above when configuring the L2TP server.
Under allow these protocols choose Challenge Handshake and Microsoft CHAP Version 2
Under the Networking tab choose IPV4 then advanced and turn off the option for Use Default Gateway On Remote Network so you can browse the internet locally while connected to the VPN.

7.

Test the connection

Enable the VPN connect and enter the username and password you created when setting up the local users on the Ubiquiti Edgemax box and hit connect. You should now be connected but the tunnel will not come live until you ping across it or try and access resources on the LAN.

Conclusion

In conclusion I found all the information was in bits and pieces scattered throughout the internet and the docs on the Ubiquiti Wiki were incomplete.
Hopefully if someone else needs to configure VPN for your Ubiquiti device this will help.


Here is the actual script i used:

configure
set vpn ipsec ipsec-interfaces interface eth0
set vpn ipsec nat-networks allowed-network 0.0.0.0/0
set vpn ipsec nat-traversal enable
set vpn l2tp remote-access authentication mode local

#Add local users for L2TP
set vpn l2tp remote-access authentication local-users username Remote password f@stsigns613

# Set a range of IP addresses that are not being used by your LAN DHCP
set vpn l2tp remote-access client-ip-pool start 192.168.2.200
set vpn l2tp remote-access client-ip-pool stop 192.168.2.220

# Set the DNS servers to give out over DHCP for VPN Name Resolution
set vpn l2tp remote-access dns-servers server-1 192.168.1.1
set vpn l2tp remote-access dns-servers server-2 1.1.1.1

# Set the authentication mode for L2TP
set vpn l2tp remote-access ipsec-settings authentication mode pre-shared-secret
set vpn l2tp remote-access ipsec-settings authentication pre-shared-secret f@stsigns613
set vpn l2tp remote-access ipsec-settings ike-lifetime 3600

# Set the l2tp listening address to the WAN IP and WAN Gateway
set vpn l2tp remote-access outside-address 66.76.177.176
set vpn l2tp remote-access outside-nexthop 66.76.177.1

# Optional to set the MTU but I do this just in case they end up on DSL or T1
set vpn l2tp remote-access mtu 1492
commit
save


Windows 8 connect to VPN before logon

Last time I did an article entitled “Connect to a Windows VPN at logon”.  Rather than duplicate, please refer to that article for details, but It has been pointed out the method outlined is not available in Windows 8.  Actually it is but Win 8 by default alters the standard domain logon that was present since Win NT of pressing “Ctrl+Alt+Del”.  Restore that and you will again have the option to connect to a VPN prior to logon so you authenticate to the domain, and have group policy and logon scripts applied.

To re-enable “Ctrl+Alt+Del” either open the Local Security Policy under Control Panel, Administrative Tools, or open the local Group Policy editor by entering in the “Run” box gpedit.msc.  The location of the policy is in pretty much the same location in both, and setting in one will update the other.

  • In the Local Security Policy editor (control panel) it is located under; Security Settings | Local Policies | Security Options | Interactive logon: Do not require CTRL+ALT+DEL
  • In the local Group Policy editor (gpedit.msc) it is located under; Computer Configuration | Windows Settings | Security Settings | Local Policies | Security Options | Interactive logon: Do not require CTRL+ALT+DEL

The default state of the policy in Win 8 is “Not Defined” which on a domain joined computer effectively results in enabled.  You need to set the policy to disabled which will force the use of “Ctrl+Alt+Del”.   After doing so, I recommend running from an elevated command prompt  gpupdate /force, though it should not be necessary when editing the local policy.  On that note; you can enforce the use of “Ctrl+Alt+Del” domain wide by creating a GPO on your Domain Controller and editing the same policy.

image

Once you do so, and log off, you will see the familiar “Press Ctrl+Alt+Delete to sign in” message in the top left corner of the logon screen.

image

After pressing “Ctrl+Alt+Del” there will be a small network icon in the lower left corner

VPNCapture2

Click on the network icon and you will be presented with any VPN connection created on that computer.  Note these VPN connections must have been created using the “Allow other people to use this connection” option.  This discussion also applies only to domain joined computers.

image

image

Enter you domain credentials, the VPN will connect, authentication to the domain will be processed, and group polices and logon scripts, including your mapped drives, will be pushed to the client.

How to join a Windows Domain using a VPN

There may be occasions where you need to join an off-site computer to an existing domain at a remote office.  Most often this would be in a situation such as a satellite office which is part of a larger corporate network and there is a site-to-site VPN in place.  Though a site-to-site VPN is by far the easiest way to join, it can be done using a Windows VPN client, which will be discussed further on in this article.  The primary problem encountered when joining the domain is DNS, but this is easily dealt with.

Joining the domain using a site-to-site VPN

  • Only 1 network adapter can be enabled on the PC joining the domain, and preferably a wired connection.  If any others exist such as a wireless card, disable until domain joined.  On occasion Bluetooth adapters will also conflict, so I recommend disabling them as well.
  • Configure the connecting PC’s network adapter either statically or through DHCP to point ONLY to the domain controller at the corporate office for DNS.  Do not add an alternate external DNS server such as an ISP or router as these will often respond first and name resolution will fail.
  • In the NIC configuration, under Internet Protocol Version 4 (TCP/IPv4) properties, click advanced, and under the DNS tab insert the corporate internal DNS suffix, such as CompanyDomain.local in the box entitled “DNS suffix for this connection”
  • image
  • Then join the domain using the traditional method of Computer (formerly My Computer) | Properties | Change Settings |  Change | enter the internal domain name | click OK | and you should be prompted for credentials for an account authorized to do so, a Domain Admin account.  If the Domain Controller is a version of Small Business Server the SBS option to use  http://SBSname/connectcomputer  or http://connect most often will not work.  (more detail and screen shots for the joining the domain process can be found below in the using a VPN client section).
  • If you wish to simultaneously import an existing local user profile, you can use ProfWiz as outlined in the following link which will both join the domain and move the profile. Though the article references SBS, it can be used with any Windows Server Version.  http://blog.lan-tech.ca/2011/05/19/sbs-and-profwiz/

Joining the domain using a Windows VPN client

Joining a domain using a VPN client is a little more involved, but not complicated. This method may work with other VPN clients, so long as they have the option to connect to the VPN before logon, but this explanation uses only the Windows built-in VPN client.  Without the ability to connect before logon, there is very little advantage even if you can join the domain, as you would not actually be authenticating to the domain.  I will assume the server end, RRAS, is configured and working for VPN client connections.

  • Log on to the PC you wish to join the domain with a local administrator account
  • Only 1 network adapter can be enabled on the PC joining the domain, and preferably a wired connection.  If any others exist such as a wireless card, disable until domain joined.  On occasion Bluetooth adapters will also conflict, so I recommend disabling them as well.
  • Establish a VPN connection.  If not familiar with doing so:
    • From the network and sharing center choose “Set up a new connection or Network”
    • Select “Connect to a workplace”
    • Choose “Use my Internet connection (VPN)”
    • Enter the public facing FQDN of the corporate VPN server such as VPNserver.MyDomain.com and enter a friendly name for the connection, anything you like.  It is also very important to check the box “Allow other people to use this connection” as you will soon have a domain account which will require access to this VPN connection.
    • image
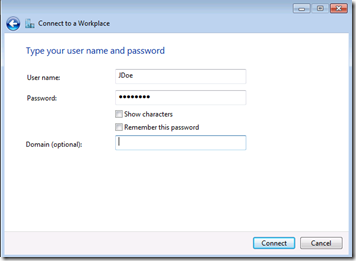
    • Enter a User name, which ideally is the user that will be using the connection once joined to the domain, but can be any user name that is authorized to connect to the corporate network via VPN.  If you use a name other than the ultimate user of the PC they will simply have to change the user name during in the connection wizard, the first time they try to connect.  Enter the password and choose connect.  For security reasons I don’t recommend checking “Remember this password”.
    • image
    • If prompted for a network type after connecting, choose “Work Network”.

  image

  • Presumably you were able to establish a connection.  However while connected if you did an NSlookup from a command line for the server name, you will see it fails. Try an NSlookup for the FQDN of the server, and it will succeed.  Thus, we need to configure DNS for the VPN clientbefore proceeding.
    • image
    • Disconnect the VPN client
    • In the network connections window right click on the VPN/PPP connection and choose properties | Networking tab | highlight Internet Protocol Version 4 (TCP/IPv4) and choose properties | Advanced | DNS tab | and enter the IP of the corporate DNS server under DNS server addresses and the internal domain suffix such as MyDomain.local in the “DNS suffix for this connection box.  If admins need to connect to the remote client PC for administration by name check the box “register this connection’s address in DNS” but I would discourage this as the IP can change frequently and cause issues.  Also on the “IP Settings” tab leave the option “Use default gateway on remote network” checked, at least for now, so that all traffic is forced to the corporate network while the VPN is connected.
    • image
  • Now you can try joining the domain
    • Connect the VPN client
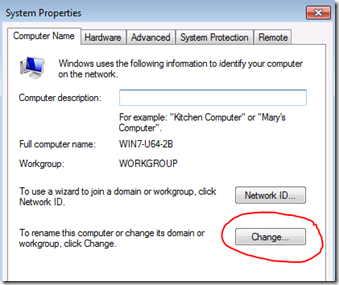
    • Right click on “Computer” (formerly My Computer) and choose properties.
    • In the resulting window select “Change Settings”
    • image
    • Slect “Change” again
    • image
    • Enter the corporate internal Domain name, such as MyDomain.local in the Domain box and click OK
    • image
    • You will be prompted for a domain account with privileges to join a PC to the domain, a Domain Admin.  Enter it and the password and you should receive a message advising you have been joined to the domain.  Be patient it takes a little longer as this is a slow link compared to the LAN.
    • image
    • You now need to reboot the connecting PC.
  • In order to authenticate to the corporate network at logon and work as if on the corporate LAN, you need to connect the VPN before logging on to the PC.  When the PC reboots press Ctrl+Alt+Delete as you normally would, and then choose  “Switch User”
    • image
    • You will then be presented with a new option, a little blue icon in the lower right corner.
    • image
    • Clicking this allows you to choose to connect to the corporate network, by using the VPN.  After entering your credentials you will see the familiar VPN connection automatically start, it will connect, and you will be authenticated to the domain.
    • image
    • Logon is a little slower of course due to the slow link, and the first time you connect it will have to set up the local domain profile.  If you make use of redirected my documents, offline files, or have a lot of group policies logon can take a very long time while they apply and sync.  If logon is too slow, you may want to review options available to the remote user.  You will note that if you now try nslookup <servername> works as it should.

Note:  If connecting from Windows 8, please see the following updated article: http://networkingtx.com/wp/2015/06/02/windows-8-conn…n-before-logon/